RAID

Granite Bay
Home Up Site Map Search


Case
Power Supply
Main Board
Processor
System Memory
Video Card
Floppy Disk Drive
Hard Disk Drive
CD-ROM Drive
Operating System
Temperature Monitor
Sound Card
DVD/CD Writer
RAID
Performance Tuning
Modem

Previous
Next

All trademarks and registered trademarks used herein are the property of their respective owners. Reproduction in whole or in part in any form or medium without express written permission by Anycpu.com is prohibited.


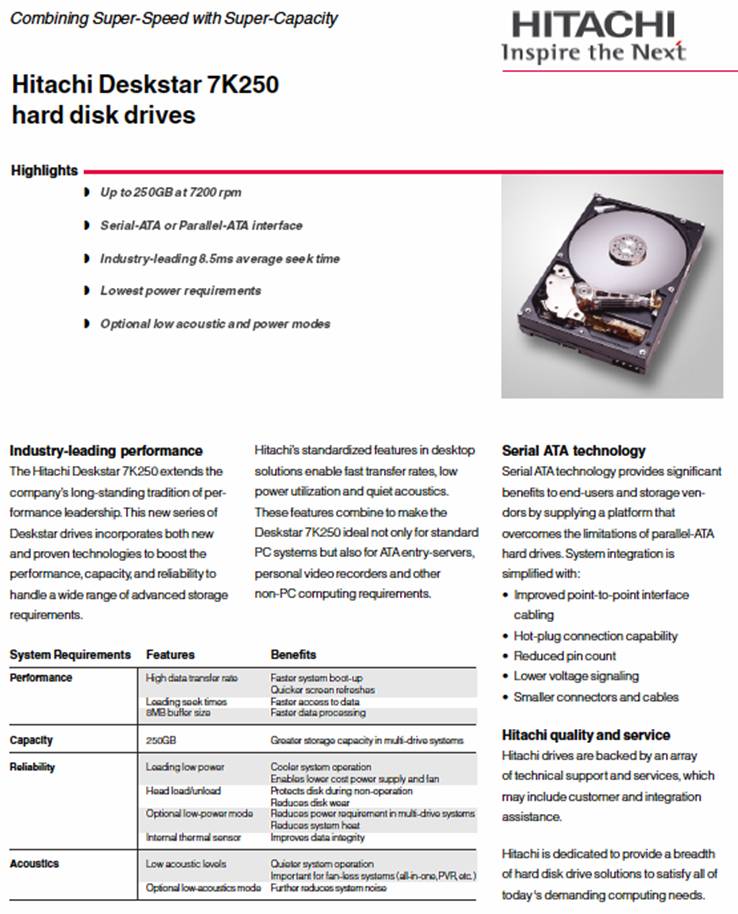
Hitachi Deskstar 7K250 SATA – 2 x 250 GB

In February 2004, two additional hard disks were added in RAID-0[1] configuration to provide lots of high-throughput disk space for video editing. The P4G8X system board has an integrated Silicon Image 3112 SATA chipset that supports two SATA drives at 150 MB/s (1.5 Gbps) max. 

Specifications | Installation | Configuration | Benchmarks | Windows Paging File

Model number: HDS722525VLSA80

"Bare" drives came in moisture barrier bags – no screws, no cables, no documentation, and no software.

On 6/21/2005, after 16 months of operation, the small plastic guide inside the SATA connector of one drive broke. The drive was returned under warranty to Hitachi and the replacement drive arrived on 7/5/05.

Specifications

Specifications page 1  Specifications page 2

Installation

Quick installation guide

Installation guide page 1  Installation guide page 1

Used the mounting screws supplied with the Kingwin case. Four screws were used for each of the two drives to mount the drives into the internal drive drawer, next to the existing Deskstar 180GXP.

Connected a SATA data cable to each of the two drives. The data cables were supplied with the main board.

Caution: The SATA connector can be easily broken when the plug is exposed to lateral forces.

Connected a 4-pin power lead from the PSU to each of the two drives.

Connected the two SATA data cables to the headers at the bottom edge of the main board.

RAID Configuration

Creating the RAID Set

The on-board SATA controller was enabled in the BIOS. Then the instructions in the PDF manual D:\Drivers\SATA\SATARaid_Manual_Rev092.pdf of the ASUS P4G8X drivers CD, section 3, were followed. Using the RAID utility during system boot, a striped RAID set was created.

During system boot, press F4 to enter the RAID utility.

RAID utility main screen.

Select “Create RAID set”.

Select “Striped” for RAID 0.

Select “Auto configuration”, which uses a stripe size of 16KB.

The RAID set was created.

PCI device listing shows the SiI 3112 SATA controller on bus number 2, device number 4.

Adding the SiI 3112 controller to an existing Windows XP installation

(Optional[2]) Follow the instructions in this section to install the Silicon Image SiI 3112 driver on a system already running Windows XP.

Verifying controller installation under Windows XP

Follow the instructions in this section to verify that the controller was installed correctly.

  1. Right click on 'My Computer' icon, select 'Properties', left click on 'Hardware' tab, and then on 'Device Manager' button.
  2. Double click on 'SCSI and RAID Controllers', If there is no yellow '! ' or ' ? ' in front of 'Silicon Image SiI 3112 Serial ATA Controller', the driver has started correctly. 
  3. To view information about the devices attached to the controller, right click the 'Silicon Image SiI 3112 Serial ATA Controller' and select Properties from the context menu, then select the tab labeled 'Device Info'.

Partitioning

Following the instructions in the PDF manual D:\Drivers\SATA\SATARaid_Manual_Rev092.pdf , section 4 of the ASUS P4G8X drivers CD a partition was created on the RAID disks using Windows XP Disk Management.

When opening the Windows XP Disk Management utility, a wizard pops up to create dynamic disk sets. Press the Cancel button.

There is only one virtual disk shown for the two physical drives that are part of the RAID array. Disk 1 is displayed as Unknown. Right-click on it and select “Initialize disk”. Now the disk displays as Basic.

Right-click on the disk space image and select “New Partition…”.  Follow the wizard to create one primary partition. Assigned drive letter F. Formatted (full format, not quick format) the partition using NTFS, default allocation unit size, volume label “Raid2x7K250”. Formatting took about 1.5 hours.

SATARaid GUI

As described in the SATARaid manual PDF the SATARaid GUI (section 2 – Windows XP/2000; SATARaid part) was installed.

The program doesn’t find any SiI adapters. Program was uninstalled.

Benchmarks

Read and write testing was performed with the advanced disk tests of PassMark PerformanceTest version 5.0 to compare single disk (drive C - Hitachi Deskstar 180GXP) and RAID (drive F) performance.

Read Tests

  • File size 2047 MB
  • Block size 16384 bytes
  • Win32 API – No cache
  • 100% Read, 100% Sequential, synchronous

Write Tests

  • File size 2047 MB
  • Block size 16384 bytes
  • Win32 API – No cache
  • 100% Write, 100% Sequential, synchronous

Read-Write Tests

  • File size 2047 MB
  • Block size 16384 bytes
  • Win32 API – No cache
  • 50% Read, 50% Write, 100% Random, synchronous

Avg. WAR

0.98 ms.

Avg. WAW

0.30 ms.

Avg. RAW

16.63 ms.

Avg. RAR

10.49 ms.

Avg. WAR

2.88 ms.

Avg. WAW

5.69 ms.

Avg. RAW

10.10 ms.

Avg. RAR

8.83 ms.

Read Tests with Replacement Drive

After one of the drives of the RAID was replaced read tests were performed with HD Tach 3 (Long tests, 32 MB zones) for the RAID (drive F) and the single disk (drive C).

Read test drive F (RAID)  Read test drive C (single)

Windows Paging File

The Windows paging file location was changed from drive C to drive F. This improves overall system performance[3] and reduces disk fragmentation on drive C.


Notes

[1] Redundant Array of Independent Disks

[2] According to the D:\Drivers\SATA\readme.txt file of the ASUS P4G8X drivers CD this step is needed. However, the Windows XP SP1 installation automatically installed more recent drivers for the RAID controller (driver version 1.0.0.40 by Silicon Image.) Therefore this step was skipped.
(Update 7/5/05) Latest RAID controller driver by Silicon Image is version 1.0.0.51.

[3] The performance boost from moving the paging file to another hard disk comes from the fact that while one hard disk is handling operating system functions, the other hard disk can simultaneously handle paging file requests.

Last modified: 09/21/2005


Copyright © 2005-2007 Anycpu.com